Automatically Generate Social Media Cards (With Images) for Articles With Hugo
Have you ever shared one of your blog posts on social media only to see a bland, generic preview appear? Or worse, no image at all? If you’re running a Hugo website, there’s a simple solution that can transform how your content appears across social platforms.
Social media cards (those rich preview snippets that show your article’s title, description, and image) provide context and visual appeal when your content is shared online. With just a few lines of Hugo template code, you can automatically generate social cards for every piece of content on your site when you publish an article.
In this article, I’ll walk through the exact implementation I’m using on this site to dynamically create social media cards that pull images directly from my article content—no manual configuration required for each post. Let’s dive into how it works and how you can implement it too.
What Are Social Media Cards?
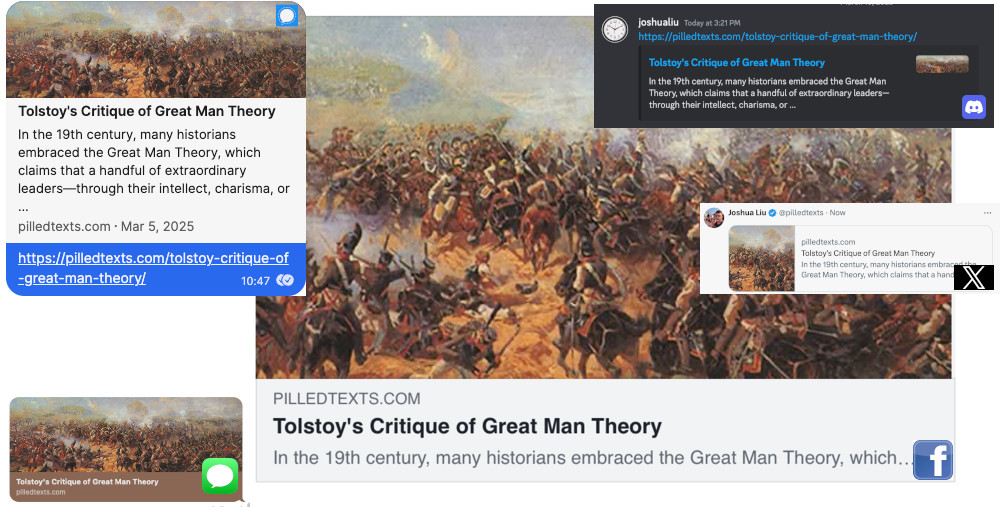
Social media cards (also called link previews or rich snippets) are the visual previews that appear when you share a link on platforms like Twitter, Facebook, LinkedIn, or messaging apps like Slack and Discord. A well-configured social card provides context about your content and includes a title, description, and image.
Understanding Open Graph Meta Tags
The Open Graph protocol, initially developed by Facebook, is now widely supported across the internet. It uses meta tags in your HTML’s <head> section to tell social platforms how to display your content when shared.
The code is below is used to generate these displays. It is placed in the baseof.html file located in the layouts/_default/ directory of my site. This is in the base template that all my content webpages generate from, ensuring that social media cards can be generated for every content page on this site.
<meta property="og:title" content="{{ .Title }}" >
<meta property="og:image" content="{{ with (findRE `<img[^>]+src=['\"]([^'\"]+)['\"]` .Content) }}{{ $image := (index . 0 | replaceRE `.*src=['\"]([^'\"]+)['\"].*` `$1`) }}{{ $image | path.Clean | absURL }}{{ else }}{{ .Site.Params.defaultImage | absURL }}{{ end }}">
<meta property="og:description" content="{{ with .Params.description }}{{ . }}{{ else }}{{ .Summary | plainify | truncate 160 }}{{ end }}">
<meta property="og:type" content="article" >
<meta property="og:url" content="{{ .Permalink }}" >
Breaking Down Each Meta Tag:
1. Title Tag
<meta property="og:title" content="{{ .Title }}" >
This sets the title displayed on the social card. It uses Hugo’s .Title variable, which pulls the title defined in your page’s front matter.
2. Image Tag
<meta property="og:image" content="{{ with (findRE `<img[^>]+src=['\"]([^'\"]+)['\"]` .Content) }}{{ $image := (index . 0 | replaceRE `.*src=['\"]([^'\"]+)['\"].*` `$1`) }}{{ $image | path.Clean | absURL }}{{ else }}{{ .Site.Params.defaultImage | absURL }}{{ end }}">
This tag automaticly pulls an image for the card from the images in the article. Here’s what it does step by step:
- It uses Hugo’s
findREfunction to search the article content for the first image tag using a regular expression - If an image is found:
- It extracts the image URL from the src attribute
- It cleans the path and converts it to an absolute URL
- If no image is found, it falls back to a default image defined in the site parameters as
defaultImage: "/images/default-social-card.jpg"in your config.yaml or config.toml file
This approach is powerful because it automatically selects the first image in the article content without requiring you to manually specify a featured image for each post.
3. Description Tag
<meta property="og:description" content="{{ with .Params.description }}{{ . }}{{ else }}{{ .Summary | plainify | truncate 160 }}{{ end }}">
This sets the description text on the social card using:
- A custom description from the page’s front matter if I choose to specify one in my front matter.
- Otherwise, it automatically uses the article summary (first 70 words by default in Hugo), converts it to plain text, and truncates it to 160 characters
4. Type Tag
<meta property="og:type" content="article" >
This tells social platforms that you’re sharing an article, which can affect how the preview is displayed.
5. URL Tag
<meta property="og:url" content="{{ .Permalink }}" >
This provides the canonical URL to your article, ensuring that social platforms link to the correct page.
Twitter Specific Cards
X.com (meta cards for X.com still need to specify “twitter” in the code) supports its own card system. These can be generated the same way that the Open Graph Meta Tags are generated as show below:
<meta name="twitter:card" content="summary">
<meta name="twitter:site" content="@pilledtexts">
<meta name="twitter:title" content="{{ .Title }}">
<meta name="twitter:summary_large_image" content="{{ with (findRE `<img[^>]+src=['\"]([^'\"]+)['\"]` .Content) }}{{ $image := (index . 0 | replaceRE `.*src=['\"]([^'\"]+)['\"].*` `$1`) }}{{ $image | path.Clean | absURL }}{{ else }}{{ .Site.Params.defaultImage | absURL }}{{ end }}">
<meta name="twitter:description" content="{{ with .Params.description }}{{ . }}{{ else }}{{ .Summary | plainify | truncate 160 }}{{ end }}">
<meta name="twitter:url" content="{{ .Permalink }}">
This Twitter-specific implementation follows the same pattern as the Open Graph tags:
- It uses the same article title from the page front matter
- It automatically extracts the first image from the content using the identical regex pattern
- It uses the same description logic (custom description or truncated summary)
- It links to the same canonical URL
The key difference is that these tags are specifically formatted for Twitter’s card system, ensuring optimal display when your content is shared on that platform.
Conclusion

With just a few lines of Hugo template code placed in my site’s template file, I’ve created dynamic social media cards that display my content. The automatic image selection is particularly useful, as it eliminates the need to manually specify the featured images.
To test how your social media cards will appear before sharing content, you can use platform-specific validation tools:
- Facebook Sharing Debugger - Enter your URL to see how it will appear on Facebook and refresh the preview after making changes
- Twitter Card Validator - Preview how your links will display on Twitter
- LinkedIn Post Inspector - Test how your content will look when shared on LinkedIn